15 Clever Ways to Ask for Reviews

Today, more than ever, online reviews play the biggest role in shaping a business’s reputation. Positive reviews can be a powerful tool for attracting new customers and boosting trust. So, how can you ask for reviews in natural and effective ways? 

In this blog, we will explore 15 clever ways to ask for reviews that will encourage your customers to share their experiences and leave valuable feedback.

1. Highlight the Importance of Their Review

Whether in person or online, take a moment to genuinely convey to your customers how much their reviews matter to your business.

When a customer provides valuable insights or leaves a positive review, respond by expressing your sincere appreciation and letting them know that their feedback helps you serve them better in the future. This personal touch not only fosters goodwill but also encourages further engagement from your satisfied customers.

2. Craft an Uncomplicated Review Process

Make it easy for your customers to leave a review by providing clear, step-by-step instructions on where and how to leave a review. Keep it straightforward and remove any unnecessary or confusing steps. The simpler the process, the more likely your customers will leave a review.

For example, you could follow this email template we made for a fictional dog grooming business:

Hi [Custom name]

Thank you for choosing Happy Tails Dog Grooming! How did our team do today? Your feedback is important to us.

  • Click this link: [LINK] and it will take you to our review page on our website.
  • Rate your experience with a single click, from 1 to 5 stars.
  • Share a brief comment about your dog’s grooming if you’d like—it’s optional.
  • Click “Submit,” and you’re done! Your review will help us improve and better serve our furry friends.

Thanks again!

Sincerely,

The Happy Tails Team

This straightforward process makes it hassle-free for customers to share their feedback and encourages more reviews for the dog grooming business.

3. Use Personalization in Review Requests

You can improve your review requests by making them sound more personal. A great start is to use your customers’ first names. You can also try going the extra mile and talking about specific things from your past interactions with them. A little extra effort can go a long way toward making your requests feel more customized to each customer’s experience.

4. Include a Review Appeal in Your Follow-up Emails

Add a review request to your post-purchase or follow-up emails. Express your gratitude for their business and kindly request a review. Provide direct links or buttons for leaving reviews to make the process as convenient as possible for them.

5. Organize Review Competitions

Why not take a stab at making reviews feel fun and rewarding? Encourage customers to participate in review contests for a chance to win prizes, such as for the funniest review or best description of your product or service. Set clear guidelines and deadlines for the competition to ensure everyone is following the rules.

6. Incorporate Review Requests on Receipts

Whether printed or digital, make sure to include a review request or QR code on your receipts. Customers can quickly forget to leave feedback after leaving your store, so prompt them to share their feedback immediately after a purchase, offering them a quick and convenient option to do so.

7. Request Reviews in Face-To-Face Interactions

Train your staff to politely ask for reviews during in-person interactions. Create a script or guideline for employees to follow, and encourage a personal and friendly approach. Never be pushy, and do everything in your power to make the interaction as organic as possible.

8. Highlight Your Current Reviews

Embed Google reviews on your website and share them on social media pages. After a fantastic customer interaction, ask your most loyal customers for testimonials to build trust with online visitors. By sharing success stories and experiences from happy customers, you create a strong proof of your expertise.

9. Send a Handwritten Note

Do you have a regular customer who always goes out of their way to support your business? Show them how much you care by sending a handwritten note along with your review request. Express your appreciation for their business in a tangible and memorable way.

10. Call Them Directly

Call your most satisfied customers directly for their valuable feedback. Engage in a short and friendly conversation, express your appreciation, and kindly ask for their feedback. Remember to contact only clients you are absolutely confident would be okay with a phone call and respect their time and preferences.

11. Swap Reviews With Other Businesses

Team up with neighboring business partners to trade reviews. Share your honest experiences as partners and provide authentic feedback. This collaborative approach fosters a sense of community and mutual support.

12. Ask Whenever Customers Express Their Satisfaction

Pay attention to positive comments or compliments from customers, and seize those moments to capture feedback while the customer is happy. Train your employees to ask in these moments as well, keeping the request light and enthusiastic.

13. Write a Review Template for Your Customers

Provide your customers with a review template or guide for those who might need help getting started. Include prompts and examples to simplify the process for them. Remember, it should be entirely optional, and customers should be made aware they can always write their own unique reviews if they prefer.

14. Ask for Reviews via SMS

Send a polite and concise review request via text message. Include a link to the review platform for quick and easy responses. Keep the message brief, below 160 characters, and follow the Telephone Consumer Protection Act (TCPA) guidelines.

Here’s an example of what this request might look like:

“Your opinion matters! We’d love to hear about your recent experience with [Company Name]. Share your thoughts, and you could win [Incentive/Giveaway]. Click here to review: [Review Link].”

15. Utilize Social Media Mentions

Are happy customers talking about you on platforms like Instagram or Facebook with their friends and followers? Don’t let this feedback get away!

Tag or mention these extremely satisfied customers on your social media platforms and request reviews in a public and engaging way. While you’re at it, encourage others in the conversation to share their experiences as well.

And there you have it, 15 clever ways to ask for reviews that can significantly impact your local business’s online reputation. Whether it’s through personalized interactions, contests, or using the power of social media, encouraging your customers to share their feedback can be both effective and fun. Start implementing these strategies and watch the magic happen.

How to Create a Facebook Business Page

Today, it’s really important for businesses, no matter how big or small, to be visible online. One way to do that and connect with your customers is by creating a Facebook Business Page.

We’re going to show you how—step by step—you can make the most of this social media platform.

Key Takeaways

  • Why You Should Have a Facebook Business Page: With over 3 billion monthly active users, Facebook is a vital platform for businesses to engage with local customers and build loyalty.
  • Major Benefits for Local Businesses: A Facebook Business Page offers increased visibility, audience insights, cost-effective marketing/advertising, and valuable business analytics tools.
  • Setting Up Your Facebook Business Page is Easy: By the end of this guide, you will have the fundamental knowledge of how to create a professional-looking and functioning Business Page on Facebook. 

The Importance of a Facebook Business Page

Before diving into the specifics, let’s understand why having a Facebook Business Page is kind of a big deal.

With over 3 billion monthly active users, Facebook provides a vast platform to reach the people you want to connect with (Statista). Your Facebook Business Page serves as a direct hub for online engagement, allowing you to connect with your local audience, share updates, and build customer loyalty.

Overview of the Benefits for Businesses

Now that we have gone over why you should care about having your business on Facebook, let’s go over just a few of the perks of being on the platform:

Increased Visibility

When you have a Facebook Business Page, it can actually boost your chances of showing up in search engine results like Google. This means more people can find you online, even when they’re not on Facebook.

Audience Insights

With a Facebook Business Page, you get access to a treasure trove of information about the people who follow you. Facebook Insights gives you data on things like their age, where they live, and what they like. This knowledge can help you tailor your content to better suit your audience’s preferences and needs.

Cost-Effective Marketing

Facebook has a powerful advertising platform that allows you to create and run ad campaigns. The beauty of this is that you can target these ads specifically to reach the people who are most likely to be interested in your products or services. This means you’re not wasting money on ads that won’t work for your business.

Customer Engagement

Facebook is a very local-centric platform. People use it to swap and sell used goods, share common interests, and create neighborhood community pages. Having a Facebook Business Page gives you the chance to tap into this hyper-local space and interact with your customers directly, where they spend most of their time.

You can respond to comments, feedback, and messages, and even create posts that spark discussions. This engagement helps build a sense of community around your local business and fosters stronger loyalty among your customers.

Setting Up Your Facebook Business Page

Now, let’s get started on creating your Facebook Business Page:

Step 1: Log into Your Personal Facebook Account

Begin by signing in to your personal Facebook account. If you don’t have one, you’ll need to create one before proceeding to the next step.

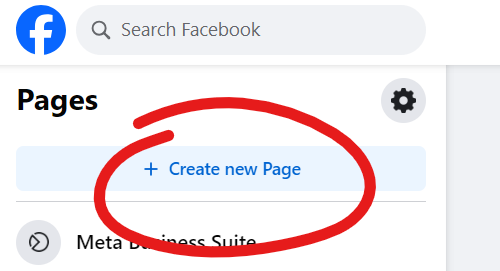
Step 2: Navigating to the Pages Section

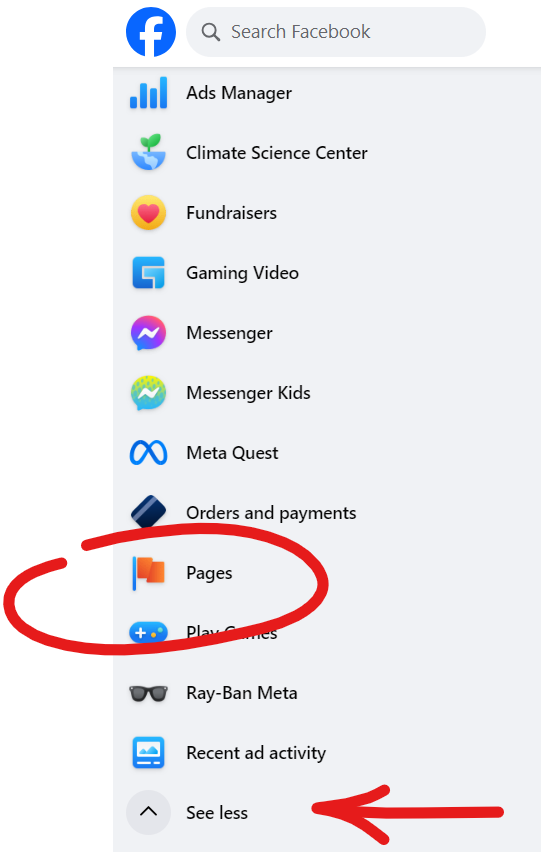
Click on the “Pages” section located in the left sidebar of your Facebook home page. You might have to click “See more” to see the whole list of sidebar options.

How to Create a Facebook Business Page

Step 3: Creating a New Page

Select “Create” to begin the process. 

How to Create a Facebook Business Page

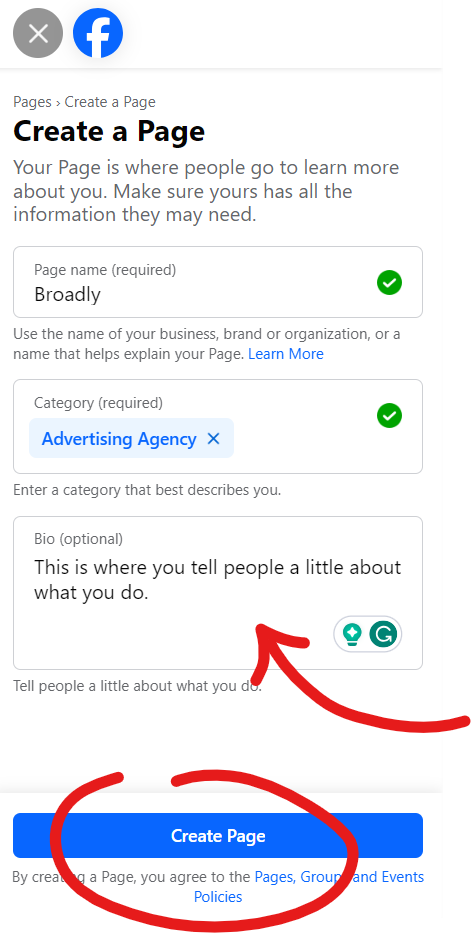
You’ll be prompted to choose a page type that best suits your business, such as “Local Business,” “Company or Organization,” or “Brand or Product.”

We filled out the form to show you what this kind of information should look like. Once you have checked for spelling and accuracy, you can click “Create page.”

How to Create a Facebook Business Page

Congrats! You just made your very own Facebook Business Page!

You might be asking yourself, “Is that really all there is to it?” The short answer is yes! However, to get the most out of your business page, we recommend setting up your page with a few more settings and details. 

Page Configuration and Setup

Now, let’s configure and set up your Facebook Business Page.

Making Updates to Your Contact Information

You can update your business category and fill in important business details, including your business name, description, phone number, address, operating hours, website, email, and more.

If you are worried you made a mistake, no worries! You can always go to the About tab on your main page to adjust the finer details, such as highlighting your service area and adding additional contact info.

Follow steps 1–5 of the set-up process to complete your configuration.

Uploading a Profile Picture and Cover Photo

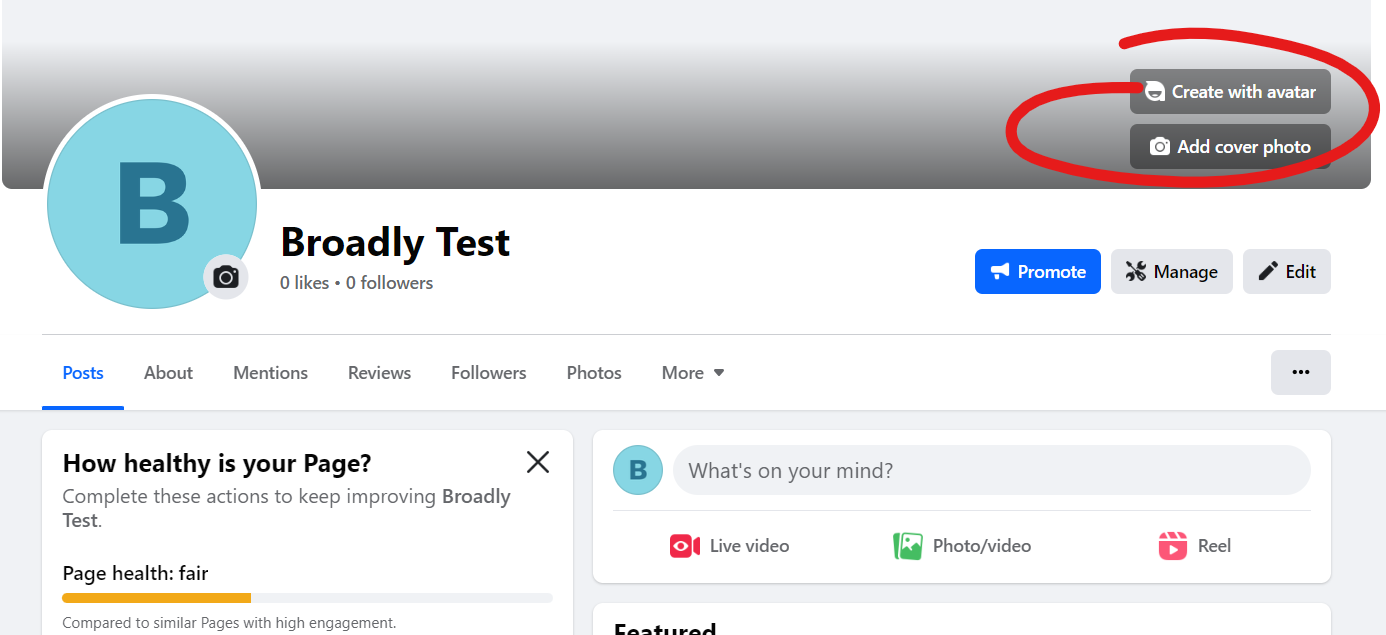
Enhance your page’s visual appeal by uploading a profile picture (usually your logo) and an eye-catching cover photo. This can be done using the buttons found on the far right of your business page.

How to Create a Facebook Business Page

Customizing Your Username (Vanity URL)

Tell us, which URL looks better to you?

Option A: facebook.com/broadly 

Option B: facebook.com/profile.php?id=6155249438286

That’s right, Option A. This version will be much easier for users to remember and can have a hand in helping you better connect with clients looking for you both on and off of the platform. However, when you look up the URL on your new page, you are most likely to see a big jumble of numbers and symbols rather than a perfectly branded link. 

So how can you make your Facebook business link look put together and professional, like your peers? The answer is customizing your username. 

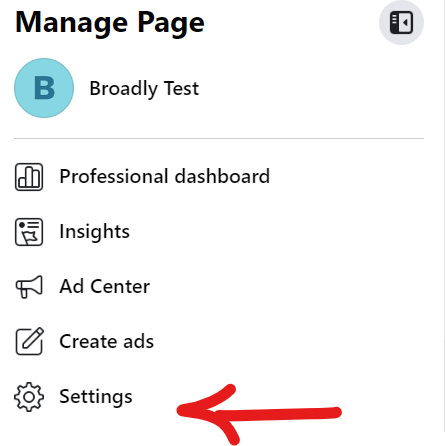
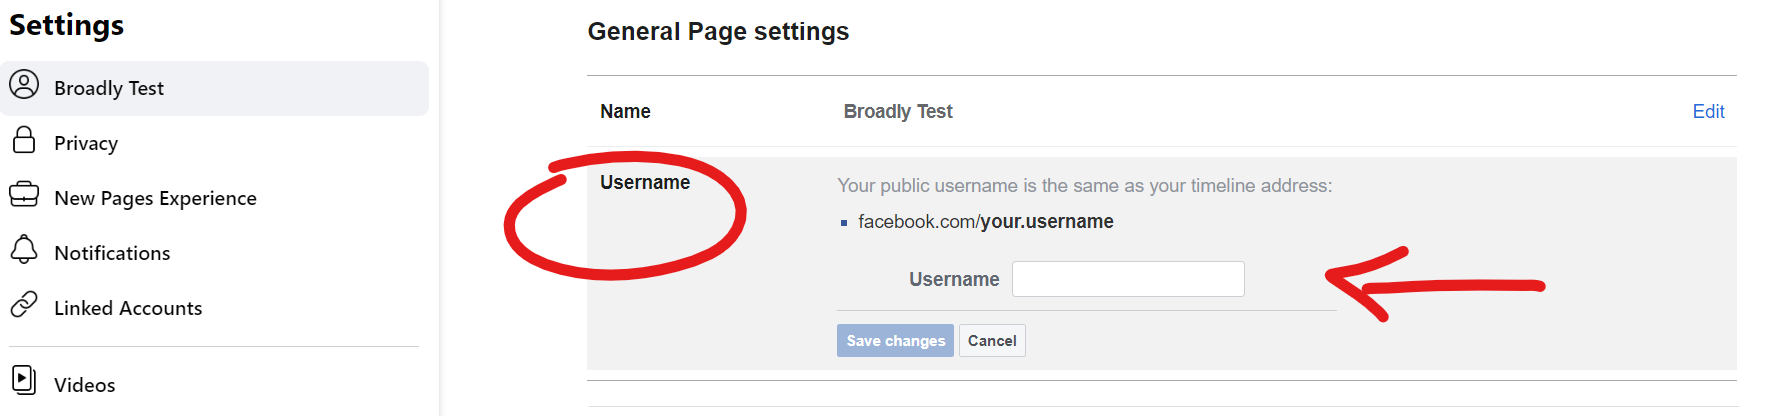
First, navigate to your settings from the main options on the left-hand side of your page.

How to Create a Facebook Business Page

From there, you will see the General Page settings appear. Under the username section, fill in your preferred username to update your custom URL.

How to Create a Facebook Business Page

Hit “Save changes” to complete the process.

Crafting an Appealing About Section

Nothing is more impactful than a well-told origin story. So, what better way to distinguish yourself from the rest than by crafting a compelling About section? You can provide essential information about your business in this space to help users discover why they should do business with you.

Some key things you should mention include: 

A Detailed Business Description

Offer a comprehensive business description that highlights your products, services, and unique selling points.

Highlighting your Mission and Values

Communicate your business’s mission and values to connect with customers who share these common interests.

Accurate Contact Details

Ensure customers can easily reach you by including your website link and other contact details (double-check everything before you save).

Now Engage!

User engagement is key to building a loyal online community. Here are some things you can try to help you hit the ground running:

  • Respond to comments and messages promptly.
  • Encourage user interaction by running polls and hosting contests.

All in all, a well-managed Facebook Business Page is a valuable tool for your local business. By continually updating and engaging with your community, you can foster customer loyalty and drive meaningful growth.

Harness the potential of this hyper-local marketing and advertising tool to take your business to greater heights.

How to List a Business on Google

Where online presence reigns supreme, you can’t afford to play hide and seek with potential customers. It’s time to strut your stuff on the world’s biggest stage—Google!

Get ready for a journey that will make your business shine brighter than your competition with our comprehensive guide to listing your business on Google. Let’s dive in, shall we?

Key Takeaways

  • We will explore the importance of Google Business Listings,
  • Walk you through setting up your Google Business Profile,
  • And delve into some tried and true strategies for enhancing your online presence.

The Significance of Google Business Listings

Before we dive headfirst into the specifics, let’s explore why Google business listings matter:

Visibility

Google is the go-to search engine for 274.49 million unique visitors every single day (Statista). With over 81.37% of search traffic originating from Google, having your business listed on this platform ensures it will be visible to the customers you are hoping to reach.

Credibility

With such a high user base and strong policy adherence for businesses, a Google listing lends credibility to your company, making it appear more trustworthy to online users.

Engagement

Having a Google Business Profile (or GBP for short) means you can better interact with your customers. Connect with them by responding to reviews, adding posts, and sharing business updates. Keeping online users engaged helps you foster a stronger sense of community between them and your local business.

Setting Up Your Google Business Account

Now that we have discussed all the great things about having a presence on Google, let’s get you set up so you can start reaping the benefits:

Step 1: Creating a Business Google Account

If you don’t have one set up for your business just yet, we’ll first start by creating a Google account. This account will be the backbone for managing your business listing. Here’s what you need to do:

  1. Go to Google.com
  2. Locate the “Sign In” button in the upper right-hand corner, and click on it.
  3. Choose the option “Create an account.”
  4. From the dropdown menu, pick “For business or professional use.“
  5. Follow the on-screen instructions to finish setting up your account.

Pro Tip: To avoid confusion and prevent security risks, it’s best to keep your personal Google account and business account separate from one another.

Step 2: Accessing Google Business Profile

Once your new business account has been created, visit the Google Business Profile website and log in using your new credentials by clicking the “Sign In” button in the upper right-hand corner.

Step 3: Starting the Listing Process

Click on the “Manage Now” button to initiate the business listing process.

Business Information and Details

Step 4: Searching for your Business on Google

If you spot your business along with its address, you’re already in the game and have a Business Profile. Let’s move forward.

No profile yet?

If your business listing doesn’t show up in the search results, don’t fret. Click on the little hamburger icon, located on the left side of the search bar. From there:

  • Hit “Add your business” to start creating your very own Google Business Profile.
  • Follow the prompts and provide some important info: your business name, category, address, service area, and, of course, your website address.
  • Next, you’ll need to share your business’s mailing address. Google calls this “verification,” but it’s really just one of the final steps on your profile setup journey.

Usually, Google likes to keep things snappy, and you should receive a nudge via email to complete your Business Profile and claim your listing shortly after you enter and submit all your information.

What if my Google business listing is already claimed by someone else?

It can feel really awkward when it appears that someone else has ownership of your business listing—after all, it is your business, not theirs. Google offers a few troubleshooting tips to help you request ownership of your business listing. 

Verification Process

Completing verification on Google requires a few extra steps. 

Step 5: Choosing a Verification Method

Google needs to be extra sure that you are who you say you are. And because of this, they will most likely ask you to select a second verification method, which can be through a postcard, phone call, or email.

Step 6: Requesting and Completing Verification

Follow the steps given to you by Google to request and complete the verification process. Once done, your business listing is officially claimed.

Completing the Business Profile

Now let’s move on to the fun part, making your Google Business Profile listing uniquely your own. You can enhance your listing with valuable information such as:

  • Detailed Business Descriptions: Craft a comprehensive business description, highlighting your products, services, and unique selling points.
  • High-Quality Visuals: Upload high-quality photos and videos that showcase your business’s offerings and ambiance.
  • Setting Business Hours: Define your operating hours and holiday hours, ensuring customers have accurate information.

Location and Service Area Settings

Help Google recommend you to local customers by setting up your location and the areas you serve. You can do this by:

  • Specifying Your Service Area: If your business serves a specific location, include your service area to target relevant customers more effectively.
  • Defining Delivery Options: If this applies to you, define your delivery options or service preferences (i.e., in-store pick-up or free delivery).

Managing Business Reviews and Ratings

Why not leverage customer feedback to your advantage? Some ways you can increase your star power on Google include:

  • Encouraging Customer Reviews: Ask your happy customers to leave a review. Genuine feedback can significantly impact your online reputation and give prospective buyers an extra nudge to do business with you.
  • Responding to Customer Feedback: Engage with customers by responding to their reviews, addressing concerns, and showing appreciation for positive feedback.

Posting Updates and Posts

Keep your audience regularly engaged with your business by posting relevant updates about what you’re up to. Some ways you can achieve this include:

  • Sharing What’s New: Share news, upcoming events, and special offers to keep customers informed and excited to stop by.
  • Highlighting Products and Services: Keep users in the loop on the kinds of things you offer. Seeing is believing, so make sure to include eye-catching professional photos and compelling descriptions that encourage them to click.

Adding Additional Users and Managers

As the saying goes, many hands make light work. When you are tied up in the weeds, it can greatly ease your mind to know another person can take up the helm. That’s why you should consider: 

  • Granting Access to Team Members: Add team members to help manage your listing collaboratively.
  • Setting Roles and Permissions: Define roles and permissions for each team member to ensure secure and efficient listing management.

Pro Tip: Remember, when adding people to your Google Business Profile, it’s smart to get everything in writing and signed by everyone involved before granting any permissions. Don’t hesitate to seek advice from a legal expert, especially if you’re handing over duties to an outside person or a freelancer.

40 Sample Text Messages to Delight Your Customers

When it comes to good customer service, communication is king and text messaging reigns supreme. For local businesses, leveraging the power of text messages can be the edge you need to stay competitive. 

In this article, we’ll explore the benefits of using text messages for customer communication and provide you with 40 sample text messages to customers to help you get started. Get ready to leave your customers pleasantly surprised and eagerly engaged with SMS updates!

Why Text Messages Matter for Your Business

Before we dive into the creative world of text messaging, let’s take a moment to understand why text messages are really great options for local businesses. People get bombarded with ads and emails regularly. Here are some stats from The Small Business Blog to put things into perspective:

  • On average, a regular person deals with a whopping 121 new emails every day.
  • These emails include spam, social updates, and promotional newsletters.
  • In 2020, a cybersecurity company called Kaspersky Lab estimated that nearly half (47.3%) of all email traffic is spam.
  • Out of all the emails sent daily, more than 3.4 billion are fake and potentially harmful, like those used in email attacks or phishing schemes.

People are weary, if not downright exhausted, by emails—and that’s where text messages can come in handy. Text messages cut through the noise. They add a personal touch to an interaction that can’t be ignored quite as easily as other forms of communication.

Important Things to Consider Before You Send Text Messages

According to Business.com there is a bit of red tape you need to navigate in order to abide by the Telephone Consumer Protection Act (TCPA). While text message marketing laws might seem intimidating and are fraught with legalese, they’re important to prevent consumers from being spammed.

Here are ways to meet these requirements and still promote your business effectively:

Get Clear Consent

When someone first joins your text list, you must provide them with all the necessary details:

  • Your business name
  • Why you’re texting
  • How often they’ll get messages
  • A statement about rates
  • Links to your privacy policy and terms
  • Instructions to opt-out

It might sound complicated, but it’s actually pretty straightforward. Here’s an example:

Hello [Name], thanks for signing up for [Company]’s Winter Sale! Expect deals every week. Message and data rates may apply. Text HELP for terms, STOP to quit.

Pro Tip: Keep things short. Carriers limit the number of characters in each text message to only 160. What happens if your message is above 160? It will send the message split in two, with the first 160 characters in one and the remainder in another. 

While sending multiple SMS messages is okay every once in a while, and some carriers can even merge these two messages together, these texts are often more expensive to transmit. Also remember, getting texted too often can bother customers and lead to them unsubscribing to your notifications, so be careful how often you ping them.

Use Keyword Shortcodes

A keyword shortcode is a word or phrase customers can text to a specific number to sign up for your texts. Make sure your disclaimer follows the CTIA guidelines and includes all the necessary details. When customers text the keyword, they’re giving their consent.

So, without further adieu, here are 40 sample text messages to help you better engage and communicate with your customers.

Welcome Messages

Welcoming a new customer is like rolling out the red carpet. It sets the tone for a great relationship. Here are five delightful welcome messages that will make your new customers feel right at home:

1. “Hey, [Customer Name]! Welcome to the [Company Name] community. Explore our range of [Products/Services] and enjoy exclusive offers just for you. Msg & data rates may apply. Msg frequency varies. Reply HELP for help; STOP to cancel. Visit [Website] to get started!”

2. “Hello there! Thank you for signing up for a [Company Name] membership. As a token of our appreciation, here’s a special discount: [Discount Amount] off your first purchase. Use code: WELCOME123 at checkout. Msg & data rates may apply. Msg frequency varies. Reply HELP for help; STOP to cancel.”

3. “Welcome, [Customer Name]! We can’t wait to see you at [Company Name] really soon. Have questions? Text HELP to reach us. Msg & data rates may apply. Msg frequency varies. Reply STOP to cancel.”

4. “Welcome [Customer Name], from all of us at [Company Name]. Your shopping journey with us begins now, and we’re here to assist in any way we can. Msg & data rates may apply. Msg frequency varies. Reply HELP for help; STOP to cancel.”

5. “Hey [Customer Name], you’ve officially joined the [Company Name] family. Ready to explore the best [Products/Services] around? Let’s make this experience exceptional! Msg & data rates may apply. Msg frequency varies. Reply HELP for help; STOP to cancel.”

Appointment Reminders

Missed appointments are a headache for both you and your customers. Ensure everyone stays on track with these helpful appointment reminders:

6. “Hi [Customer Name], don’t forget your appointment with [Company Name] tomorrow at [Time]. We’re looking forward to meeting you at [Location]. Need to reschedule? Reply ‘RESCHEDULE’.”

7. “Your appointment with [Company Name] is just around the corner on [Date] at [Time]. We’ll be ready to serve you at [Location]. See you soon!”

8. “Friendly reminder: Your appointment with [Company Name] is on [Date] at [Time]. Please arrive 10 minutes early, and if you have any questions, don’t hesitate to reach out to us at [Phone Number].”

9. “As your appointment with [Company Name] approaches, we want to ensure everything runs smoothly. See you on [Date] at [Time] at [Location]. Text 1 to confirm your appointment, 2 to reschedule.”

10. “Mark your calendar, [Customer Name]! Your appointment with [Company Name] is set for [Date] at [Time] at [Location]. We’re committed to making this a great experience. Text 1 to confirm your appointment, 2 to reschedule.”

Following Up with New Leads

Turning leads into customers requires timely follow-up. Here are five engaging text messages that will keep your leads interested:

11. “Hi [Lead’s Name]. This is [Employee] from [Company Name]. I’d love to schedule a quick 10-minute chat to discuss your needs. Schedule it here: [link] “

12. “Hi, [Lead’s Name]. This is [Employee]. Thank you for your interest in [Company Name]. I’d love to connect over a quick call. Let’s find time to chat: [link]”

13. “Hey there, [Lead’s Name]! Thank you for your interest in [Products/Services]. Let’s schedule a meeting to discuss how we can meet your needs. Book here: [link]”

14. “Great things are on the horizon, [Lead’s Name]. Let’s schedule a chat about how [Company Name] can make your goals a reality. What’s your preferred time for a quick discussion?”

15. “We’ve got exciting solutions for you, [Lead’s Name]. When can we connect to talk about how [Company Name] can meet your unique needs?”

Promotional Text Messages

When you have exciting promotions to share, let the world know! These five promotional text messages will have your customers rushing to your door:

16. “[Customer Name], unlock amazing deals at [Company Name] today! Shop [Product/Service] and enjoy up to [Discount Percentage] off until [Date]. Visit us at [Location] or explore online at [Website Link]”

17. “The savings continue at [Company Name]’s [Season] Sale! Grab your favorite [Product] at a discount of [Discount Amount] until [End Date]. Hurry before it’s gone!”

18. “Don’t miss out on our exclusive offer, [Customer Name]! Get [Product/Service] with a [Discount Percentage] discount. Limited stock available, so shop now at [Website] or our store at [Location].”

19. “Here’s an offer you can’t resist, [Customer Name]! Discover [Product/Service] with a whopping [Discount Amount] off. Your dream deal awaits at [Company Name].”

20. “Ready for unbeatable savings, [Customer Name]? Grab your [Product/Service] with a massive [Discount Percentage] discount. Visit us today at [Location] or shop online at [Website].”

Ask for Feedback and Reviews

Customer feedback is more precious than gold. These five messages will encourage your happy customers to share their thoughts and maybe win a little something in return:

21. “Your opinion matters! We’d love to hear about your recent experience with [Company Name]. Share your thoughts, and you could win [Incentive/Giveaway]. Click here to review: [Review Link].”

22. “We’re constantly striving to improve. Share your feedback on your recent purchase from [Company Name], and receive your next [Product] on us! Click here to review: [Review Link].”

23. “Help us enhance your experience with [Company Name]. Share your feedback and be entered to win a [Prize/Gift]. Click here to review: [Review Link].”

24. “Your voice matters to us, [Customer Name]. Leave a review of your recent experience with [Company Name] and have a chance to win big. Click here to review: [Review Link].”

25. “Ready to have your say, [Customer Name]? Review your recent interaction with [Company Name] and seize the opportunity to win a [Prize/Gift]. Click here to review: [Review Link].”

Order Confirmation

Customers love to know that their orders are in good hands. Use these order confirmation messages to keep them excited:

26. “Congrats, [Customer Name]! Your order #[OrderNumber] is confirmed. We’re packing it up, and it will be on its way to you by [Expected Delivery Date]. Track your order at [Order Tracking URL].”

27. “Great news! Your order with [Company Name] has been successfully placed. Order #[OrderNumber] will be dispatched on [Expected Delivery Date]. Keep an eye out for shipping updates.”

28. “Thanks for shopping with [Company Name]. Your order #[OrderNumber] is confirmed. You can anticipate delivery on [Expected Delivery Date]. For order updates, visit [Order Tracking URL].”

29. “The moment you’ve been waiting for, [Customer Name]. Your order #[OrderNumber] with [Company Name] is confirmed. It’s on its way, and you can track it here: [Order Tracking URL].”

30. “Exciting times, [Customer Name]! Your order #[OrderNumber] is confirmed and will be sent to you by [Expected Delivery Date]. Keep an eye on your delivery status at [Order Tracking URL].”

Rewards for Repeat Customers

Loyal customers deserve a little extra love. Here are five messages to show your appreciation:

31. “Hello, loyal customer! As a token of our appreciation, we’re offering you [Discount Percentage] off your next purchase. Use code: [CODE] at checkout. Enjoy your savings!”

32. “You’re a valued member of the [Company Name] family, [Customer Name]! Your next purchase comes with a special reward—[Free Product] when you spend [Minimum Amount]. Redeem in-store or online!”

33. “It’s customers like you who make us smile, [Customer Name]. Get [Discount Amount] off your next order as a thank-you for your continued support. Use code: [CODE] at checkout.”

34. “Thank you [Customer Name], for being our customer for [Number of Years] amazing years! Enjoy [Discount Percentage] off your next purchase at [Company Name]. Use code: [CODE] and save!”

35. “Every purchase is a step toward fantastic rewards, [Customer Name]. Your next order with [Company Name] is [Discount Percentage] off. Use code: [CODE] and claim your savings!”

Payment Reminders 

Gentle payment reminders ensure you get what’s due without being intrusive. Here are five tactful payment reminders to keep things on track:

36. “A friendly reminder, [Customer Name]. Your payment of [Amount] for invoice #[InvoiceNumber] is due on [Due Date]. Have questions? Reply HELP for assistance.”

37. “This is a courtesy reminder that your invoice #[InvoiceNumber] with a total of [Amount] is awaiting payment by [Due Date]. To settle, click here [Payment Link] or contact us at [Phone Number].”

38. “Your upcoming payment is on our radar, [Customer Name]. Please ensure payment of [Amount] for invoice #[InvoiceNumber] by [Due Date]. If you have any questions, feel free to reach out.”

39. “It’s that time again, [Customer Name]. Your invoice #[InvoiceNumber] for [Amount] is due on [Due Date]. For quick and easy payment, click here [Payment Link] or call us at [Phone Number].”

40. “Keeping everything in order, [Customer Name]. Your payment of [Amount] for invoice #[InvoiceNumber] is expected by [Due Date]. To make the process easy, click here [Payment Link] or contact us at [Phone Number].”

Embrace the power of text messages and watch your customer communication game soar to new heights.

These 40 sample messages have you covered in various scenarios, but remember, thoughtful communication resonates with your customers more than a template, so experiment and find what works best for you.

How will you use these sample texts to delight your customers?